The Secret to Homemade Chicken Soup

chicken soup
my grandmother’s secret to chicken soup? her homemade noodles.
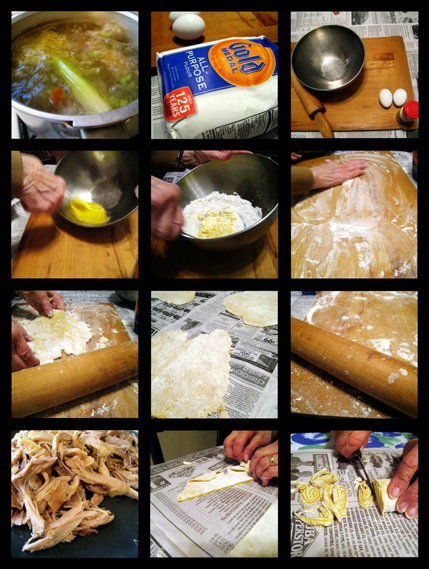
flour + egg is all you need.

Seems to me that the people who write recipes must have have some secrets up their sleeves, or a rabbit in their hat.  Because I can’t otherwise explain how they can possibly do things like caramelize onions in 30 minutes or get a really good sear on a cut of meat in 2 minutes per side.  It’s as though time is suspended in their kitchen.

Anytime I read a recipe I feel like I should start mentally marking up the cooking time that is quoted as guidelines.  I need to sweat onion and celery till soft and you say it should take about five minutes.  In my kitchen it’s more like ten or fifteen minutes.  Roast my veg for 30 minutes until tender?  Please, I’m giving that pan a shake every 30 minutes.

Am I responsible for some of the discrepancies?  Absolutely.  Am I using a large enough pan?  Maybe not.  Am I cooking over a high enough heat?  Maybe not.  Have I overcrowded my pan?  Possibly.  All of these differences could partly explain why it takes me longer to get from Point A to Point B than you say it will.  As far as the rest of the explanation…I will never know.

One thing I do know is that some secrets can be cracked.  Like the secret to homemade chicken soup.

The secret is simple, use a rotisserie chicken as both the base of the stock and the meat for the finished soup.  No more taking up valuable freezer space to save random chicken parts until you have enough for a soup.  And no more spending a whole day with a pot slowly simmering away on the stove.  Who has time for that?

One rotisserie chicken is all you need.  Simmering the stripped carcass and skin in chicken broth gives you a full and rich stock in no time at all.  Now, if you want to tell people that this soup took you all day so that you could sneak in some alone time, I can promise that your secret is safe with me.

Easy Chicken Soup

Adapted from Cook’s Country

BAH Note:  Use this as your guide and then fancy it up any way you like.  Add rice or noodles!  Don’t want to give peas a chance?  Substitute frozen corn instead.  Do what makes you happy.

I make a mess in the kitchen on my good days.  So when a recipe tells me to pour 8 cups of hot liquid through a strainer, I see danger signs.  Instead of tempting fate, and 2nd degree burns, by trying to pour steaming hot liquid out of the hot stock pot, I break the process down into a few steps.  I place a mesh strainer in a bowl large enough to hold all the liquid.  Then I use tongs to remove the chicken from the pot and place it in the strainer.  Using a big ladle, I run the stock from the pot through the strainer.  Lastly I scrape any bits from the bottom of the stock pot into the strainer.  Once all the liquid has drained off the chicken and vegetables, the strainer rests in the sink until the bones and veg have cooled enough to go in the trash.

  • 1 1/2 tablespoons olive oil
  • 1 onion, chopped
  • 2 celery ribs, chopped
  • 1 whole rotisserie chicken
  • 6 cups chicken broth
  • 4 cups water
  • 2 bay leaves
  • pinch red pepper flakes
  • 1 clove garlic
  • 2 carrots, peeled and diced
  • 1 onion, diced
  • 1 cup frozen peas

Break down the rotisserie chicken and shred the meat into bite sized pieces.  Keep the skin and bones for making the stock.  And be sure to scrape any gelled juices out of the chicken carrier.  That’s pure gold right there and it needs to go in your soup pot.

Heat 1 tablespoon olive oil in a dutch oven over medium heat.  Add the onion and celery and cook until the vegetables begin to soften about 10 minutes.  Add the chicken bones and skin, broth, water, bay leaves, red pepper flakes, and garlic to the pot and bring to a boil.  Reduce the heat to medium low and simmer, partially covered, for 30 minutes.

Strain your stock through a mesh strainer and press on the solids to get as much liquid out as possible.  Return the stock to your dutch oven.  You want to have about 8 cups of liquid by this point.  If you have less than 8 cups, add water till you get there.

While the stock cooks, take the diced carrot and onion and remaining 1/2 tablespoon (that’s 1 1/2 teaspoons) olive oil and microwave on high for approximately 5 minutes or until the vegetables soften.

Transfer the softened carrot and onion mixture to the chicken stock.  Stir in the frozen peas and chicken and cook for another 5 minutes.  Taste for seasoning and add kosher salt and pepper to taste.

{printable recipe}

Apple Upside Down Cake

Apple Cake with Caramel Sauce

I have a love/hate relationship with CSA’s.  I love the premise…buying local fruits and vegetables to support the farms and growers in the area.   Or, as one of the more popular local CSA’s says:

Community Supported Agriculture (CSA) is a mutually beneficial relationship between farmers and the community. Participants provide funding for the farmer in advance of the growing season in exchange for produce when it’s ready. Items vary according to the season. They could be beets, lettuce, potatoes, tomatoes, a watermelon — whatever is ripe for picking.

Sounds like a win-win, right?  As much I want to say the answer is yes, I can’t.

Because a traditional CSA obligates you to participate every week for the length of the season. Considering that I don’t know what life is going to throw my way from week to week to week, how in the world does it makes sense for me to commit to 24 weeks of anything, let alone produce buying?  Not to mention the fact that despite my best intentions, sometimes the produce I bring home doesn’t get used up in a week.  It often lingers and takes up the limited amount of storage space in the crisper and on the counter.  If I manage to line up a weekend get away, I can skip my pickup but I’ve still paid for that week.  So in the larger picture the produce just got more expensive on a per item basis.

Selection flexibility varies by grower.  Some prepackage the shares which means that you get what you get.  Other growers allow you to pick your items week to week from whatever they have available.  There is no set guideline so it is up to each CSA to decide how much flexibility you get in selecting your items.

Did I mention that you pay up front for your spot?  Prices vary but a full share (typically 6-8 selections per week) will run between $500 and $600.  Averaged out, it’s about $20 to $25 per week which certainly is a great value.  But I would be hard pressed to come up with that kind of cash in a single transaction.  Sure you can sign up for a half share for a slightly lower cost or split a share with someone.  And some CSA’s even allow you to pay the cost in three or four payments.  Personally, cost has been probably the biggest factor preventing me from really jumping on the CSA wagon.

My last issue with CSA’s is that the pick up isn’t convenient for me.  Could I get myself to the farmer’s market at 8am on a Saturday?  I suppose.  But I’m not inclined to.  Could I arrange to get to a pickup location on a weekday?  That’s even less likely given that I’ve usually got a small person in tow and at the end of the work day, neither of us wants to sit in rush hour traffic to pick up some veg…we’d rather go home and veg.

These are the reasons that I have poo-pooed CSA’s.

But then I stumbled across a CSA, on Facebook of all places, that seemed like it had been created just for me.  There’s no long term commitment.  I get to decide from week to week if I want to purchase anything.  That alone makes me giddy.

No long term commitment means that I pay as I go.  So I don’t have to come up with a chunk of cash to “secure” my share at the beginning of the growing season.  That makes my checkbook happy.

There are multiple share sizes…fruit share, vegetable share, half share, full share, double share, dairy share, egg share.  The choices are almost dizzying.  So I’m able to select the option that is right for me.  As if that wasn’t enough flexibility, I can request a substitution here and there.  If they can accommodate the request, they do!  In my last pickup, I was able to sub out two butternut squash for the week’s kale and watermelon…I totally got the better end of that.  And if I want to add some a la carte items, I can do that too.  I’ve come home with local butter, bacon, and berries thanks to a bit of impulse buying at pick up.

As if that wasn’t enough to arouse my interest, I get a three day pickup window.  All I have to do is say which day and be there between Noon and 7pm.  Seriously, even I can fit in a ride down the highway at some point on a Saturday or Sunday….sometimes even a Monday if the stars align.  That makes my overprogrammed schedule happy.

My discovery of this Wendi-friendly CSA is how I came to be in possession of a crate of local Honey Crisp apples.  On a weekday afternoon.  At home alone.  When The Universe gives me this kind of gift, you better believe I take full advantage of it.

So I pulled out a recipe for Apple Cake with Caramel Sauce and got peeling, chopping, and baking.  I may have taken a few liberties with the recipe and had a complete fail on my first attempt to get the sugar to cook into caramel, but I reveled in the luxury of having the freedom to get my hands, and my pans, dirty, and in finding a CSA that works on my terms.

Apple Upside Down Cake

Adapted from Bon Appetit, October 2013

BAH Note:  Bon Appetit gave this a fancy French name but when you strip away all the fancypants Francais, it’s an apple upside down cake.  I think the cake shines brightly enough on its own that I’m saying the caramel sauce is optional.  If you’d like to exercise that option, click on the link to Bon Appetit above and you can access the caramel sauce recipe.

  • 10 tablespoons butter, melted and cooled
  • 2 tablespoons butter
  • 1 1/4 cups all purpose flour
  • 2 pounds tart apples (Pink Lady, Honey Crisp, Braeburn), peeled, cored, and sliced 1/2″ thick
  • 1 cup plus 2 tablespoons sugar
  • 1 teaspoon baking powder
  • 3/4 teaspoon kosher salt
  • zest of 1 lemon
  • 3 large eggs
  • 1 teaspoon vanilla

Heat oven to 350 degrees.  Line a 9″ round cake pan with parchment.  Butter and flour the pan and set aside.

Melt 2 tablespoons butter in a large skillet over medium heat.  Add apples and 2 tablespoons sugar and cook until the apples become golden brown, approximately 10 to 20 minutes, stirring occasionally.  Allow the apples to cool slightly while you prepare the cake batter.

Whisk together the flour, 1 cup sugar, baking powder, salt, and lemon zest in a medium bowl.  In a separate bowl, whisk together the eggs, melted butter, and vanilla.

Pour the egg mixture into the flour mixture and stir until just combined.

Spread the apples into the bottom of the prepared pan.  Pour the batter over the apples and bake until a tester inserted in the center of the cake comes out clean, approximately 35 to 45 minutes.  Transfer the cake to a rack to cool for about 10 minutes.  Flip the cake out of the pan onto the rack, remove the parchment, and allow the cake to cool completely.

{printable recipe}

Deb’s Buttermilk Roast Chicken

Buttermilk Roast Chicken

What is it about getting older that makes my bad memory even worse?  I freely admit that it’s not unusual for someone to tell me a story about a past event that I was part of and have absolutely no recollection of it.  Not a speck.  I just shake my head and mutter “if you say so”.  They could be making it up and I wouldn’t know the difference…not that I’m inviting them to test this theory or anything.

One of my college roommates has this disturbing power of recollection.  She can talk about something that happened years ago with exquisite detail….we did this and you were wearing this and he said this and blah, blah, blah.  It makes my head hurt to think of all that detail just swimming around in her brain waiting for a chance to be called upon. But good on her for being able to pull random facts out at will.

This forgetfulness of mine recently paid a visit to me in the kitchen.  See, I had been recommending Smitten Kitchen’s Buttermilk Roast Chicken to someone and realized that I couldn’t remember the last time I made it.  Not because I’m walking around like Guy Pearce’s character, Leonard, in Momento but because it had been months since this dish hit my table.  So I put buttermilk and chicken on the grocery list and when the time came to set up the chicken and the buttermilk on a blind date, all I could remember was that the two needed to hang out in the fridge for a day or so.  I forgot that they needed some sweet and spicy chaperones.  It wasn’t until I went back and looked at the recipe for the oven temp that I realized my mistake.

Thankfully, not even my crappy memory was able to break this recipe.  Because I seasoned the chicken with paprika, salt, and some chili seasoning after its milky date and it was every bit as delicious as if I had remembered to season the buttermilk in the first place.

Deb’s Buttermilk Roast Chicken

Adapted from Smitten Kitchen

BAH Note:  Super delicious.  This might even become your weeknight go to chicken dish.  You could set your oven as high as 425 degrees and cook for 30 to 45 minutes.  It may sound foolish but that kind of heat makes me nervous….so you do what you’re comfortable with.   Either way you get delicious, moist chicken.

  • 2 cups buttermilk
  • 2 cloves crushed garlic (optional)
  • 1 tablespoon kosher salt
  • 1 tablespoon sugar
  • 1 1/2 teaspoons paprika (sweet or smoked, whatever you have)
  • 1 teaspoon black pepper
  • 3 pounds bone in, skin on chicken (you use the parts you like best)
  • 1 teaspoon olive oil

Combine the buttermilk, garlic, salt, sugar, paprika, and pepper in a zip top plastic bag or a bowl large enough to hold the chicken.  Add the chicken and marinate in the refrigerator anywhere from 2 hours to 48 hours.

When ready to bake, heat your oven to 375 degrees and line a baking dish or sheet pan with foil.  Remove the chicken from the buttermilk brine and place in your dish or pan.  Drizzle the olive oil over the chicken and roast for 45 – 60 minutes until done.

{printable recipe}