Pan Fried Corn

to post graphic

I’ve been digging around the junk drawer that is my draft folder.  In a concerted effort to clear out the mental clutter, I’m posting this drafts ‘as is’….

Pan Fried Corn

Adapted from Add a Pinch

BAH Note: To make this creamy, add about 1/2 cup milk to the pan along with the corn.

  • 4 strips bacon, cut into bite sized pieces
  • 4 ears of corn, kernels cut off
  • 1/2 teaspoon kosher salt
  • 3/4 teaspoon cumin
  • 1 tablespoon butter

Cook the bacon in a large frying pan over medium heat until browned, but not crisp.  Add the corn kernels, salt, and cumin and cook for approximately 15 minutes, stirring every few minutes.  Add the butter and stir to combine before serving.

{printable recipe}


Parmesan Roasted Cauliflower

Roast Cauli

I’ve been digging around the junk drawer that is my draft folder.  In a concerted effort to clear out the mental clutter, I’m posting this drafts ‘as is’….

Parmesan Roasted Cauliflower

Adapted from Bon Appetit

  • 1 head of cauliflower, thinly sliced
  • 2 cloves garlic, skin on
  • 1 onion, sliced
  • 2 tablespoons olive oil
  • 1/2 teaspoon kosher salt
  • 1/2 cup grated parmesan

Heat your oven to 425 degrees and line a sheet pan with aluminum foil.

Combine the cauliflower, garlic, onion, olive oil, and kosher salt on the sheet pan and use your hands to make sure the vegetables are coated with oil.  Roast for 45 minutes or until the cauliflower and onion are golden brown and starts to char on the edges.  Sprinkle the parmesan over the cauliflower and serve immediately.

{printable recipe}

Butter Broasted Carrots

8714125363_5ae3c635e0_b

They aren’t exactly braised.  They aren’t exactly roasted.  They’re somewhere in between…they’re broasted.  And they are exactly how I’m cooking up six pounds of carrots this weekend.  I know that sounds like a whole hell of a lot but between a carrot loving toddler, the base for a carrot soup, and a pot luck contribution, I think it might not be enough.

Butter Broasted Carrots

Adapted from Cooking Light, Pick Fresh

BAH Note:  I’m a wimp when it comes to high heat roasting.  It always ends up badly for me.  If you are braver than I am, try using Cooking Light’s recommended temp of 425 degrees for 15 minutes.  Me, I take a lower and slower approach.

  • 2 to 3 cups roughly chopped carrots
  • 1 tablespoon melted butter
  • 1 tablespoon olive oil
  • 1/2 teaspoon kosher salt

Heat oven to 375 degrees and line a sheet pan with aluminum foil.  Combine the carrots, butter, olive oil, and salt on the baking sheet and toss to fully coat the carrots.  Bake for 30 to 40 minutes or until the carrots reach your desired tenderness.

{printable recipe}

Breand and Butter Pickles

Bread and Butter Pickles

Allow me a Seinfeld moment….what’s the deal with Bread and Butter Pickles?  There is neither bread nor butter in the recipe.  So they’re called Bread and Butter because????

Now that I’ve gotten that out of my system, let’s talk quick pickles.  Quick pickles are one of those things that are so simple to make that it’s embarrassing to admit I had never made them before.

They don’t require any processing…meaning no standing over a vat of boiling water in the dead of summer.  My A/C has a hard enough time keeping up with the effects of global warming outside my house.  The last thing I need is to turn the kitchen into a sauna and ask my tired Carrier to work that much harder.

In their simplest form, they don’t need any exotic ingredients…meaning you’ve probably got the most essential of the ingredients in your pantry. Got some salt, sugar, and vinegar?  Then you’ve got the makings of a quick pickle.

They are essentially a blank canvas…meaning that if you choose to, you can fancy them up.  Give them an Asian flare with soy sauce and rice vinegar.  Go bold with red pepper flakes.   Or maybe try the timeless classic combination of garlic and dill.

They make quick work of almost any vegetable you happen to have….meaning all those cucumbers, zucchini, radishes, carrots, and squash don’t have to languish on your counter or in your crisper until they start collapsing in on themselves. I can’t begin to calculate the amount of produce I have wasted that could have been pickled instead of being trashed.

So I finally got my act together.  And in the time it took to slice, salt, rinse, boil, and cool (all of maybe 90 minutes) I had a jar of pickles in the fridge at the ready.  As Ina would say, how easy is that?

Bread and Butter Pickles

BAH Note:  Be sure you use whole mustard seed and celery seed.  Without going in to the sad details of how I know, the ground versions of the spices don’t work as an even swap.  These pickles are not meant to be shelf stable.  They need to be refrigerated.

  • 1 1/2 – 2 pounds cucumbers, sliced
  • 1 tablespoon kosher salt
  • 1 onion, thinly sliced
  • 1 cup granulated sugar
  • 1/4 cup brown sugar
  • 1 cup white vinegar
  • 1/2 cup apple cider vinegar
  • 1 1/2 teaspoon mustard seed
  • 1/2 teaspoon celery seed
  • 1/8 teaspoon ground turmeric

Combine the sliced cucumbers and salt in a bowl and let them sit for 30 minutes.  Transfer the cucumbers to a colander, rinse well, and then spoon into a bowl or jar along with the onions.

Combine the remaining ingredients in a small saucepan and cook over medium heat until the sugar dissolves and the brine comes to a nice simmer.

Carefully pour the hot brine over the cucumbers and onion.  Allow the mixture to cool slightly and then cover and refrigerate.  Give them a day or two and then enjoy them while they last.

 {printable recipe}

Flashback Friday – In A Pickle

Flashback Friday

The following originally appeared on 5/4/09 on Exit 51.

In A Pickle

Lists are a big thing with me.  I make them constantly to remind myself of anything and everything.  It becomes clearer to me with each passing day that I manage to forget more than I remember.  To steal a line from an interview Russell Brand gave to NPR, “I’m an unreliable witness to my own existence.” Fortunately, this condition has not progressed to the point where I make lists of the lists that I need to make.

Canned

Let me say that when I’m making the grocery list, I try very hard to make sure I’ve double checked the recipes I plan to make against the list.  Otherwise, I could find myself in a pickle.  Like yesterday.

After plowing through my latest food memoir, I had made a mental note that I wanted to try the pickled carrot recipe.  I knew were were going to be having people over for a dinner party and I wanted to have those carrots on the menu.  So, without consulting the recipe, I picked up what I thought I remembered as the ingredients.  And then I forgot all about it.

The weekend before the dinner, I was out and about and checking things off other lists.  Laundry, check.  Housework, check.  Yard work…lots of yard work, check, check, check.  After battling the weeds for three hours, I picked up the recipe again.  And I realized that not only did it need a week in the fridge to pickle, but I had only managed to remember about half of the ingredients.  Among the things that I forgot, canning jars.  So what do you do?

You either scrap the recipe or you get yourself to the megamart in a jiffy.  Did you know that canning jars aren’t sold individually?  They aren’t.  So I either need to LOVE this recipe and make it to give to everyone I know, or find uses for the other eleven jars.

Until next Sunday, the jury is still out on the fate of the pickled carrots.  I’m sure I will remember to tell you how it all goes…it’s already on the list.

Molly’s Spicy Pickled Carrots

From A Homemade Life by Molly Wizenberg

  • 2 cups apple cider vinegar, plus more for topping jars
  • 2 cups water, plus more for topping jars
  • 1/4 cup granulated white sugar
  • 6 (5 to 6 inch) sprigs fresh thyme
  • 5 large garlic cloves, thinly sliced
  • 1 1/2 teaspoon black peppercorns, cracked
  • 1 1/2 teaspoons red pepper flakes
  • 1 1/2 teaspoon salt
  • 2 teaspoons brown mustard seeds
  • 1 1/2 pounds small (finger sized) carrots, or standard sized carrots cut into sticks about 1/2 inch wide and 3 inches long

Combine 1 1/2 cups vinegar, water, sugar, thyme, garlic, black peppercorns, red pepper flakes, salt, and mustard seeds in a medium saucepan.  Bring to a boil over medium-high heat, reduce to a simmer and cook for 10 minutes, stirring occasionally.  Remove pan from heat and let stand for 5 minutes.  Add remaining 1/2 cup vinegar.

Put carrots in large heatproof bowl, pour warm brine over them. Cool to room temperature.

While the carrots cool, wash two quart sized canning jars and their lids in warm soapy water.

When carrots and brine are cooled, divide carrots evenly between jars, arranging them snugly.  Using your fingers and wide mouth canning jars makes this easier.  Divide the brine evenly between the jars.  The carrots should be completely covered by the brine.  If not, add a mixture of 2 parts vinegar and 1 part water to cover.

Seal firmly and refrigerate three days to a week.  The carrots take time to absorb the brine.

Flashback Friday – Q&A

The following post appeared on BAH on 14 August 2009.

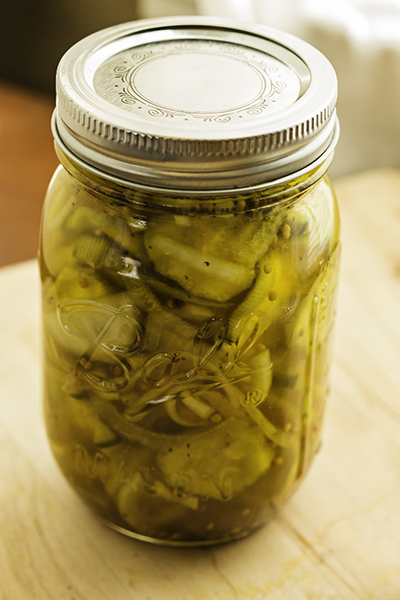
A great thing about blogging is that it allows conversation between blogger and reader.  Like when I  tried Food In Jar’s Dilly Beans.  After trying the recipe, I commented on the post about the results I got.

I said: “I wonder what I could have done wrong with the recipe.  My brine ended up being overly salty even though I only used 1/4 cup.  Other than that, these are lovely.  The texture is crispy and snappy.”

Imagine my surprise when Food In Jars said: “What kind of salt did you use? Did you make these as refrigerator pickles or did you can them? Crazy part is, this isn’t actually even my recipe, it’s one from So Easy to Preserve, so it should be tested and reliable.

I went back and looked at the post, and in your original comment, you mentioned that you wanted to make them as fridge pickles. I’m wondering is the amount of salt needs to be reduced if you don’t hot water process pickles. Now that I think about it, all the recipes I use/know for refrigerator pickles do call for less salt. It’s probable that recipes for shelf stable pickles call for more salt because it plays the part of preservative as well as seasoning.

Now that you’ve got these salty pickles, you could give them a quick rinse before eating or chop them up and make them part of a salad (omitting much of the salt).  Again, I’m so sorry that you had this problem. I admit, I didn’t notice an overabundance of salt in my batch, but I’m a notorious salt lover, so I rarely feel that there’s too much (it’s a sickness).”

See, I didn’t get some autoreply like “thank you for your comment”.  She took the time to read my question and provide a thoughtful response which actually gave me some great insight as well as a new tip to try out.

Every single blogger I’ve met, and most (but certainly not all) of the ones I’ve reached out to via comments or email, seem to geniunely want a conversation with their readers.  For me, that’s half the fun of it all.  The other half is that I get to try my hand at things like Dilly Beans, Jacques’ Scallops,  and Bittman’s Chocolate Souffle .  So send those comments and questions.  I promise not to answer with my mouth full.

Dilly Beans

Food In Jars, adapted from So Easy to Preserve

FIJ Notes: Wide mouth pints work great here.  A 12 ounce jelly jar is also nice as it’s a bit taller than a standard pint and makes for less trimming.

BAH Note: I used a wide mouth quart jar. I did not process the beans after they were in the jar since long term storage was not my goal and the beans currently live in my refrigerator.  But I’ve included the instructions on how to prep and process in case your beans can hang out longer.

  • 2 pounds green beans, trimmed to fit your jars
  • 1 teaspoon cayenne pepper
  • 4 teaspoons dill seeds (not dill weed)
  • 4 cloves garlic
  • 2 1/2 cups white vinegar (5% acidity)
  • 2 1/2 cups water
  • 1/4 cup pickling salt (use a bit more if you only have kosher and will be processing your jars, use a bit less if using kosher for non processed jars i.e. fridge pickles)

Prep your canning pot by inserting a rack to keep your jars off the bottom of the pot, place jars in pot and fill pot with water.  Bring to a boil to sterilize while you prepare the rest of your ingredients.

Wash and trim your beans so they fit in your jar.

Combine vinegar, water, and salt in a medium saucepan and bring to a boil.  While it’s heating up, pack your beans into the jars, leaving 1/2 inch headspace (distance between the tops of the beans and the rim of the jar).  To each jar, add 1/4 to 1/2 teaspoon cayenne pepper, 1 clove garlic, and 1 teaspoon dill seeds.

Pour the boiling brine over the beans, making sure to leave 1/2 inch of headspace.  Use a plastic knife to remove air bubbles from the jar by running it around the interior of the jar.  Wipe the rims and apply the lids (which have been sitting in a small saucepan of water at a mere simmer for at least ten minutes in order to soften the sealing compound) and rings.

Process for 5 minutes in a boiling water bath (five minutes start when the pot has come to a roiling boil).

Let beans age for at least two weeks to develop their flavor.

Sweet Potato Hash

No, no, you’re not caught in a time loop.  You did just see that chicken two days ago.  But this is the only photo that shows the sweet potato and Brussells sprout hash that went with the chicken.  So the photo gets to make an encore appearance.

Hash.  What exactly is it?  According to the all knowing google, it is a dish of cooked meat cut into small pieces and recooked, usually with potatoes.  The only problem is that the amount of meat vs. the amount of vegetables I consume is pretty frightening.  Ideally, the ratio should be reversed which shouldn’t be hard because I actually LIKE vegetables.  I just run out of ideas of how to fix them.  So as a result, they waste away in the fridge, or on the counter, until they are beyond possible consumption.  Yes, I am guilty of wasting food.  There, I’ve said it.

So how does hash address my status as a repeat offender when it comes to wasting food and get me to up my servings of veggies?  Simply by being.  Hash is a godsend when it comes to using up vegetables that have been neglected.  Don’t know what to do with that sad sweet potato that you didn’t use the other week?  Got a carrot or two left in the crisper?  What about an onion?  Did your plan of pan roasted Brussells sprouts not materialize?  You’ve got everything you need for hash.  What other vegetables are hash friendly?

According to Pam Anderson, in her book Meatless Meals, mushrooms, corn (fresh or frozen), eggplant, turnips, and butternut squash are all prime candidates.  She’s the one who introduced me to the concept of meatless hash.  So whether I want a side dish to go with one of my meaty meals, or I want a satisfying meat free option, all I have to do is open the fridge and see what vegetables need some love.

Sweet Potato Hash

Adapted from Pam Anderson’s Meatless Meals

  • 2 tablespoons vegetable oil
  • 1 to 1 1/2 pound (one medium or large) sweet potato, peeled and diced
  • 1 large onion, diced
  • 1 pound Brussels sprouts thinly sliced  (stems trimmed, outer layer of leaves removed)

Heat the vegetable oil in a large frying pan over medium high heat.  Add the sweet potato, onion, and Brussels sprouts and stir to coat with the oil.

Place a lid on the frying pan and reduce the heat to medium.  Cook for approximately 10 to 15 minutes or until the vegetables have softened but your thickest vegetables are still just a bit firm.  Remove the lid, stir the vegetables in the pan, increase the heat back to medium high and cook until the liquid evaporates and the vegetables begin to caramelize.

Once the vegetables have browned on the bottom, stir them gently to try and get the browned sides up.  Continue cooking, without stirring, until the vegetables are as browned as you want them.  Taste for seasoning and add kosher salt and black pepper to taste.

{printable recipe}

Kerrygold Brussel Sprouts

Today’s Kerrygold Premium Spreadable Reduced Fat Butter tip crosses a line.  The line between love who love brussel sprouts and those who don’t.  And maybe, just maybe, this tip will inspire some to embrace the beauty of pan roasted brussel sprouts.

Think back to the Kerrygold Grilled Cheese.  The only thing missing from that to make a balanced meal was some vegetables.  Sure, you could microwave a bag of frozen vegetables but why would you settle for a one dimensional side when you could have the pan roasted goodness of brussel sprouts?  Forget about the bland, mushy things that have been boiled to death.  Pan roasting them in a bit of Reduced Fat Butter brings out a subtle, sharp, almost mustardy edge and they stay firm enough to spear on your fork.  This is the only way we make brussel sprouts at our house.  And there’s never a single one left at the end of the meal.

Did I mention that The Mistah and I used to be on opposite sides of the brussel sprouts line?  We used to be…and then I pan roasted them for him.  So on that night when you need an easy vegetable to round out your meal, give pan roasted brussel sprouts a try.  You might just be surprised.

Pan Roasted Brussel Sprouts

BAH Note:  Don’t be alarmed if some of the leaves end up loose in your pan.  Let these leaves get good and charred.  They will add a bit of crunchy texture to the dish.

  • 1 container fresh brussel sprouts
  • 2 tablespoons Kerrygold Premium Spreadable Reduced Fat Butter
  • kosher salt
  • Kerrygold Ivernia cheese, grated (optional)

Trim the stem ends from the brussel sprouts, cut them in half, and remove the outer layer of leaves if they look a little sad.

Melt the butter in a large frying pan over medium high heat.  Add the brussel sprouts, cut side down, and sprinkle with a pinch of salt.  When the cut sides are nicely charred, carefully shake the pan or use tongs to flip them over.  Continue to cook, occasionally giving the pan a shake, until the brussel sprouts are bright green and are just tender when you bite into one.

Serve the brussel sprouts with a sprinkle of grated Ivernia cheese.

Official Disclosure: Kerrygold provided me with their Premium Spreadable Butter and Premium Spreadable Reduced Fat Butter to use in developing these tips as part of a contest.  The opinions, and #butterlove, expressed here are my own.

Flashback Friday – Crush

Flashback Friday

The following originally appeared on 2/11/09 at Exit 51.

Crush

Who was the first person you had a crush on?  It’s ok, I won’t tell anyone.  Me?  My first crush was probably Shawn Cassidy.  Yes, I grew up surrounded by Tiger Beat and Teen Beat magazine hotties.  Oddly enough, I was not allowed to buy those magazines. In hindsight, I think that may have shielded me from some less worthy crushes like Scott Baio, Kirk Cameron, and Duran Duran.

I still get crushes.  But let’s be honest, what are the odds of your crush ever turning into a real relationship?  Unless of course, you happen to be Katie Holmes and your crush is Tom Cruise.

tb10a

I find that more and more, I develop crushes on recipes.  They woo me with their online photos and descriptions until I can think of nothing else.  I am beholden to their charms.  And then, finally, I give them a chance.  Much like the fickle adolescent that I used to be, I tend to get over these crushes pretty quick.   The idea of them is better than the reality of them.  But some do turn into lasting relationships.  They are the TomKat of my cooking world.

Here’s my latest crush.  I can’t decide whether it’s a keeper or not.  I think I need to give it one more chance to win me over.

Crushed Sweet Potatoes with Roasted Garlic and Ginger
The Washington Post, From executive chef Ethan McKee of Rock Creek at Mazza.

The dish can be fully assembled, then cooled, covered and refrigerated up to 2 days in advance. To reheat, cover loosely with aluminum foil and bake in a 350-degree oven for about 25 minutes, stirring occasionally.

  • 4 large (3 pounds) sweet potatoes, scrubbed well, then cut lengthwise into quarters
  • 4 sprigs thyme
  • 4 sprigs rosemary
  • 10 to 12 cloves garlic (from 1 head)
  • 1 cup nonfat vegetable broth
  • Kosher salt
  • Freshly ground black pepper
  • 1 teaspoon freshly grated ginger root
  • 1 tablespoon brown sugar substitute or light brown sugar
  • 1 tablespoon good-quality olive oil

Preheat the oven to 350 degrees. Have ready a large, lidded baking dish.

Combine the potatoes, herb sprigs and garlic in the baking dish. Pour the vegetable broth over and season lightly with salt and pepper to taste. Cover (or use aluminum foil, wrapped tightly) and bake for 1 hour or until the potatoes are easily pierced with a fork and the garlic is tender.

Transfer to the stovetop; discard the herb sprigs and use a potato masher to crush the vegetables. Add the grated ginger and the brown sugar substitute or brown sugar, stirring to mix well. Drizzle the oil over the top, mixing just to combine. Taste and adjust the seasonings as needed. Serve warm.

Peppers and Zucchini

This was one of those rare dishes that got a split decision in our house.  The Mistah, he says he is not much for zucchini.  Although he “claims” to like my curried zucchini soup.  And he devoured the zucchini and pepper quesedilla that I made last night.  So I don’t know what to think.

Actually, I know what I think.  I think this makes a lovely, light dish. It’s a refreshing change from the usual suspects that show up on our plates in the role of vegetables. And it’s versatile.  Serve it as a side dish; use it as a condiment to top a burger; transform it into an entree with some couscous or quinoa.

So pay no mind to The Mistah and his zucchini fickleness.  Peppers and zucchini will give you a taste of summer any time of the year.

Peppers and Zucchini

Adapted from Bon Appetit – Fast, Easy, Fresh

BAH Note:  I started out to make a poblano rajas with zucchini.  Bon Appetit – Fast, Easy, Fresh describes rajas as roasted chile strips cooked with onion and spices.  But they wanted me to add a half cup of cream to the vegetables.  And I just couldn’t bring myself to do that.  I also neglected to add any seasoning other than kosher salt.  Maybe when I go to heat up the leftovers, I will add a pinch of ancho chili powder.

While I think this recipe is pretty SB friendly, if I wanted to make it completely South Beachy, I would use olive oil, or a combination of butter and olive oil to sautee the vegetables.

  • 2 poblano chiles
  • 2 red peppers
  • 2 small zucchini, sliced
  • 1/2 cup onions, diced
  • 1 tablespoon butter

Place a rack directly under your broiler and line it with a sheet of foil.  Place the poblano chiles and red peppers on the foil.  Broil until the exterior is completely charred, carefully turning them as needed.  Transfer them to a bowl, cover with plastic wrap, and let sit for 15 to 20 minutes.  Carefully remove the charred skin (and seeds if you like) and roughly chop the peppers.

Heat the butter in a dutch oven over medium heat.  Add the chopped peppers, zucchini, and onions.  Saute until the onions are translucent and the zucchini is tender.  Season to taste with salt and pepper.

{printable recipe}